
What is Automotive Detailing?
Automotive detailing is a meticulous process of thoroughly cleaning, restoring, and protecting a vehicle, both inside and out. It goes far beyond a regular car wash, which simply removes surface-level dirt. Detailing is about precise attention to every detail, from the paint to the upholstery, with the goal of making the car look as close to new as possible. It involves specialized tools, techniques, and products for each surface and material to ensure a comprehensive and non-damaging clean.
The Importance of Automotive Detailing
Detailing is not just about aesthetics; it’s a critical part of vehicle maintenance with numerous benefits:
- Preserves Value: A well-maintained vehicle with a pristine appearance commands a higher resale or trade-in value. Detailing prevents wear and tear that can devalue a car over time.
- Protection: The exterior of a car is constantly exposed to harmful elements like UV rays, road salt, bird droppings, and industrial fallout. Detailing applies protective layers (like wax, sealants, or ceramic coatings) that shield the paint and other surfaces from damage and corrosion.
- Extends Lifespan: By preventing rust and wear on both the interior and exterior, detailing helps extend the overall lifespan of the vehicle and can reduce the need for future repairs.
- Health and Safety: A clean car is a safer and healthier car. Detailing removes allergens, germs, and bacteria that can build up in the interior. Furthermore, a clean windshield and clear headlights improve visibility, enhancing safety on the road.
A World-Class Detailing Process
A professional, world-class detailing process is a systematic and multi-step journey to perfection. While the exact steps may vary, a comprehensive process typically includes:
Exterior Detailing
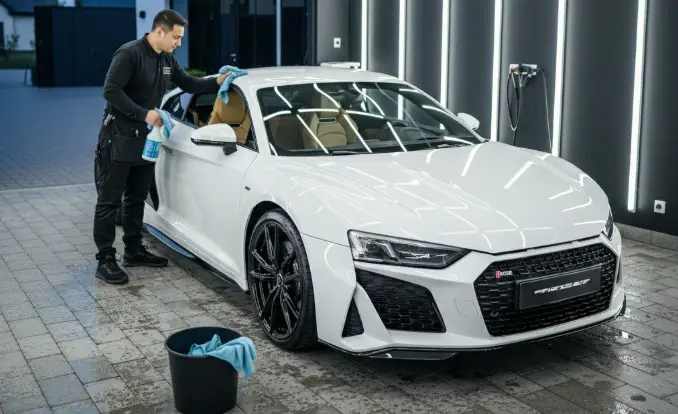
1. Pre-Wash and Decontamination:
This initial stage is crucial for safely removing surface dirt and bonded contaminants. Skipping this can lead to scratching the paint during the hand wash.
- Process: Start by rinsing the car to remove loose dirt. Apply a pre-wash foam using a foam cannon. Let it dwell for a few minutes to lift and soften grime. While the foam is on, you can use a dedicated wheel and tire cleaner to tackle those areas. After rinsing the foam, you can use an iron remover spray. This chemical specifically targets and dissolves stubborn iron particles (like brake dust) that are embedded in the clear coat.
- Key Products: pH-neutral snow foam, dedicated wheel cleaner, and iron remover.
2. Two-Bucket Hand Wash
The two-bucket method is a detailing standard that significantly reduces the risk of adding new scratches and swirls to your paint.
- Process: Fill one bucket with soapy water (the wash bucket) and the other with clean, plain water (the rinse bucket). Dip your wash mitt into the soapy water, wash a section of the car, then rinse the mitt thoroughly in the clean water before going back to the soap. This keeps the wash water clean and prevents you from dragging dirt across the paint.
- Key Products: Quality car wash soap, two buckets with grit guards, and a microfiber wash mitt.
3. Clay Bar Treatment
Clay barring is a critical step for achieving a truly smooth and clean paint surface, preparing it for correction and protection.
- Process: Knead a piece of detailing clay into a flat patty. Using a dedicated clay lubricant spray, gently glide the clay over a small section of the paint. The clay will pick up microscopic contaminants that are bonded to the paint, like tree sap, overspray, and industrial fallout. Fold and re-knead the clay frequently to expose a new, clean surface.
- Key Products: Detailing clay bar and clay lubricant spray.
4. Paint Correction (Polishing)
This is the step that restores your car’s deep gloss by physically leveling out the clear coat.
- Process: Using a dual-action or rotary polisher, apply a small amount of polishing compound to a polishing pad. Work on a small section at a time, moving the machine slowly in a crosshatch pattern. The abrasives in the polish will remove a micro-layer of the clear coat, eliminating swirls, light scratches, and oxidation. This step can often be done in multiple stages—starting with a more aggressive compound and then a finer polish for a final gloss.
- Key Products: Polisher, various polishing pads (cutting, polishing, finishing), and different grades of polishing compound/polish.
5. Sealant and Wax
Once the paint is corrected, you need to protect it. This layer acts as a sacrificial barrier against UV rays, environmental fallout, and road grime.
- Process: Apply a paint sealant or wax to the corrected paint. Sealants, often synthetic polymers, offer longer-lasting protection (typically 6-12 months) and are more durable. Waxes, derived from carnauba, provide a warmer, deeper gloss but have a shorter lifespan (a few weeks to months). For maximum protection and shine, many detailers apply both—a sealant followed by a layer of wax.
- Key Products: Paint sealant, carnauba wax, and microfiber towels for application and buffing.
6. Final Touches
The final details bring the whole process together, ensuring every part of the exterior is meticulously finished.
- Process: Clean all exterior glass with a streak-free glass cleaner. Apply a tire dressing to the tires for a deep black, satin or glossy finish. Treat any exterior plastic and rubber trim with a dedicated dressing to restore its color and protect it from fading. Finally, clean the door jambs to complete the professional look.
- Key Products: Glass cleaner, tire dressing, trim restorer, and all-purpose cleaner for door jambs.
Interior Detailing
7. Initial Cleanup and Vacuuming
The first step in interior detailing focuses on removing all loose debris and thoroughly cleaning the floor and seat surfaces.
- Process: Start by removing all personal items, floor mats, and trash from the interior. Use a powerful vacuum cleaner with appropriate attachments to thoroughly vacuum carpets, floor mats, and upholstery, paying close attention to crevices and under seats.
- Key Products: High-powered vacuum cleaner with various attachments (crevice tool, brush attachment), trash bags.
8. Deep Cleaning
This phase involves a thorough and meticulous cleaning of all interior surfaces, addressing dirt, stains, and grime.
- Process: Use dedicated interior cleaners to wipe down all hard surfaces like the dashboard, door panels, center console, and steering wheel. For carpets and upholstery, use a carpet and upholstery shampoo, potentially combined with a steam cleaner or extractor, to deep clean and remove stains. Address headliners and other fabric surfaces with appropriate gentle cleaners.
- Key Products: All-purpose interior cleaner, carpet/upholstery shampoo, steam cleaner or hot water extractor, various brushes, microfiber towels.
9. Restoration and Protection
Once surfaces are clean, this step focuses on conditioning and protecting materials to extend their life and maintain their appearance.
- Process: Apply a high-quality leather conditioner to all leather surfaces to moisturize, prevent cracking, and restore suppleness. For plastic and vinyl surfaces, use a UV protectant or dressing to guard against fading and cracking from sun exposure, while enhancing their appearance.
- Key Products: Leather conditioner, UV protectant/dressing for plastic and vinyl, applicator pads, microfiber towels.
10. Glass and Final Wipe-Down
The concluding step ensures crystal-clear visibility and a spotless finish, along with a final inspection.
- Process: Clean all interior glass, including the windshield, windows, and mirrors, with a streak-free glass cleaner and a clean microfiber towel to ensure perfect clarity. Perform a final wipe-down of all cleaned surfaces to remove any missed spots or streaks. Reinstall floor mats and perform a thorough final inspection to ensure every detail meets the highest standard.
- Key Products: Streak-free glass cleaner, clean microfiber towels.
This is the overview, hope you liked it. Come back every week for more as I dig into each step in detail and fill you in on the products I use to make my car shine. Thank you for reading and let me know where I can bring more value.
Welcome to the Vitality community!
-MAV